For her birthday breakfast, I made the sticky bun version of the cinnamon rolls I'd made for her first day of Kindergarten.
 |
| Look at all that caramel-pecan goodness! |
Caramel topping:
3/4 c packed brown sugar
1/4 c heavy cream
2 Tbsp light corn syrup
1/2 tsp table salt
1 c chopped pecans, toasted (one of their magazines had a tip to actually "toast" them in the microwave for 1 minute - genius! I always burn mine in the oven!)
Prepare the cinnamon rolls all the way until you have sliced the dough logs into rolls to be put into the tray.
Sometime in the 2-hour rising period I made the caramel topping:
Boil brown sugar, cream, corn syrup, and salt in a saucepan over medium-low heat, 2 minutes. Pour caramel into prepared pan, then sprinkle pecans over caramel.
Heat oven to 375 degrees.
Once your rolls are ready, place over the caramel mixture. For presentation sake, leave a large space between rolls. I didn't, and they were pretty compact. We weren't looking for gorgeous presentation, though, so ours were tightly packed. Cover with a towel and let rise until puffy, about an hour; remove towel.
Bake rolls until browned, 30-35 minutes. Let rolls rest 5 minutes in the pan, then turn out onto your serving platter.
My mom took Kiersten (and the rest of us) out for her birthday dinner on her actual birthday. Thank goodness for that, because during Nolan's nap on her birthday, I made her cake, and between that and decorating the porch as a surprise for when she got home, I was exhausted.
K had asked me if I could make zebra striped icing, but I told her I wasn't quite ready to tackle that task just yet. So I decided to surprise her with a marbled cake made to look like zebra stripes. I used the cake recipes from the Williams-Sonoma book Cupcakes for the batters. They had the consistency I needed for the effect I wanted. I had already made these flavors for my aunt's wedding cake last summer, so I knew they were good. I added Wilton black color gel to the chocolate cake batter. Unfortunately, I had gotten distracted at some point and forgot the butter!! Luckily, since it was marbled with the perfectly-made vanilla cake mix, it wasn't a complete disaster. I've determined now that I have to make the chocolate cake again to redeem myself. I used the Wilton buttercream recipe with their Rose gel color for the icing. The effect of the cake did not disappoint.
 |
| I found the zebra print cake board at Walmart! |
Birthday dinner #2 was made up of her favorite foods. Unfortunately, she had what we call a non-eating day. Non-eating days are where she doesn't eat foods she normally loves. It's frustrating, as I'm sure you parents can well understand. She asked for bacon-wrapped chicken. I had made it once after finding it on Pinterest, and we loved it. I also made corn on the cob and sweet potato fries.
 |
| The birthday girl's plate. Yeah, we went all-out with the zebra print. |
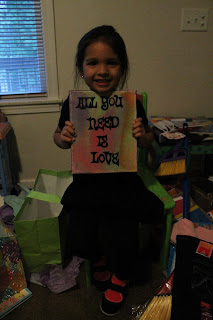
Now for the craft project, a quote sign for her room. I knew the quote I was going to use ("All You Need is Love" - her all-time favorite song); I also knew that I wanted to use a cool painting technique. The big issue came about when I couldn't find my Cricut vinyl. If you've read my previous post, you know that wasn't really a shocker. So, I was on the hunt for both a painting technique AND a font to use to either hand paint or trace onto the canvas. After searching the 'net for a week, I found a technique AND a font. I wasn't thinking ahead to the blog, so I forgot to bookmark the video I used for inspiration. Basically, take acrylic paints in your desired colors and dilute them with equal parts water. Tape off the edges of the canvas so you have a lip to prevent paint from going over. You then pour the paint onto the canvas in sections and tilt the canvas to get the effect. I used an offset spatula to "push" the paint to the edge of the canvas, which is what was done in the video. Once the canvas was dry, I used the "Happy Days" font from my go-to font site, dafont.com, and printed out my song lyric. I cut it out and traced it onto the canvas, then painted it in using black paint, and then painted the edges of the canvas purple. Once the entire project was dry, I put on a layer of Mod Podge Matte. Her face when she saw it was pretty spectacular. Especially since she actually READ it herself.
 |
| Now to find a spot to hang this! |
Whew...Okay. Time to finish taking down all the zebra décor and make the house look like fall has descended upon us. That means a trip up to the attic. Fun part: in 3 weeks we're doing another week-long celebration for Richard. I think I need a nap now, just thinking about it. Maybe I need to hit up Starbucks for a PSL. Whaddya think?
Till next week, my friends!
No comments:
Post a Comment